Working hard developing your app and now it's time to let others begin testing your team's work. Fortunately, the process is far more streamlined nowadays. Don't misunderstand my comment, for newbies there remain barriers and hurdles to cross.
The App I'm walking through today has been built with Typescript and Angular. The process is the same with native iOS app too.
TestFlight offers testing for two types of groups, internal and external. Getting to the facts with testing:
- Internal
- Limited to 100 testers;
- Requires no Apple review
- External
- Up to 10,000 testers;
- Requires a limited review by Apple before you can publish
Back to internal testers - this group will be people you know as you have to add them to your App Store account. While external testers will be people from the public you solicit to test, but may not necessarily know. They’ll be added to a different group and will not have access to your App Store account, just the app through TestFlight.
1. Apple developer account
To have an iOS app you will need an Apple developer account. If you don’t already have an account, go to https://developer.apple.com and sign up.
With a working developer account, the next steps:
Open Xcode preferences by clicking on the Xcode menu in the top left and clicking Preferences or simply press ⌘, (command + comma).
Click on the second tab, Accounts
Click the + (plus) button in the bottom left

Select Apple ID
Click Continue
Enter the Apple ID and Password for your Apple Developer account
Click Next
2. Set your version and build number
Every archive uploaded to the App Store needs a unique version and build number combination. I work from the premise that only change the version when I’m doing a production release to the public. Between each production release, I'll upload many development updates to TestFlight and those are tracked with build numbers.
You can start your Xcode with version 1.0 and build 1. Regarding version schemes, one of the more common is Semantic Versioning or SemVer. SemVer you will have seen or used previously as it uses three components in the version number, Major.Minor.Patch. I currently working with version 1.0.5 and build 2.
3. Create an Archive
Preparing to upload to the App Store. You begin this step, by creating an Archive of your app to be uploaded. How, well by:
In the toolbar, where you normally select your real device or a simulator, either select a real device or select: Any iOS Device (arm64). If you have a simulator selected, you can’t archive.

Click Product at the top, to open the Product menu

Click Archive (if Archive is grayed out, make sure you don’t have a simulator selected in the toolbar)
You’ll see a few different status messages in the toolbar and once complete, the Organizer window will appear.
4. Distribute your app
In the archives organizer's, you’ll see the archive you've just created. The date should be today’s date/time with the corresponding version and build number in parentheses.
- To distribute to a limited number of users on registered devices only - for example, distribute within your organization then select Ad Hoc or Development.
- To distribute using TestFlight or through the App Store, choose App Store Connect.
- If you are a member of the Apple Developer Enterprise Program and are ready to release your app to users in your organization, choose Enterprise.
- To distribute a macOS app without code signing, choose Copy App.
- To distribute a macOS app outside the App Store that is notarized by Apple or signed with a Developer ID, choose Developer ID.
Select the corresponding archive and click the Distribute App button.
Using the differences noted above, in the next few screens in most cases you'll go with the default settings.
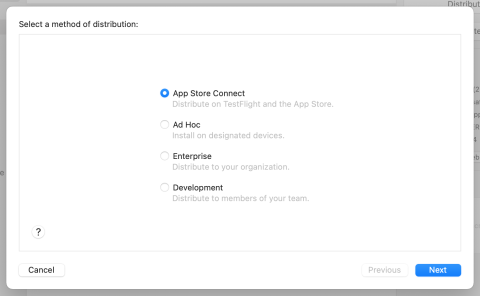
For Select, a method of distribution, select App Store Connect and click Next
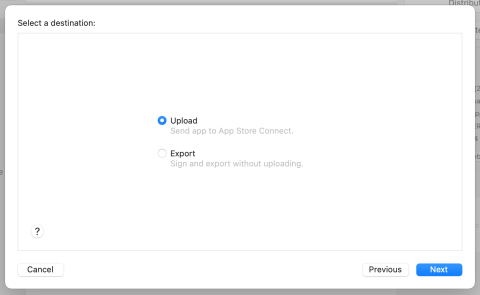
For Select, a destination, select Upload and click Next
For Preparing app record, you will only see this screen the very first time you’re uploading your build. Everything on this screen should be what you selected when you first created your app in Xcode. If everything looks correct, click Next.
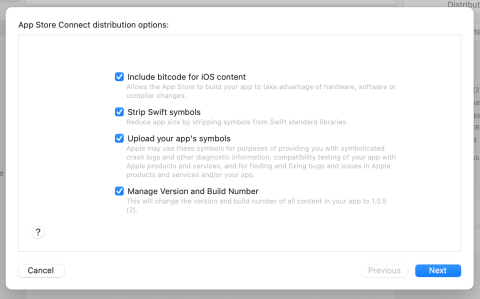
For App Store Connect distribution options, leave the four options checked and click Next
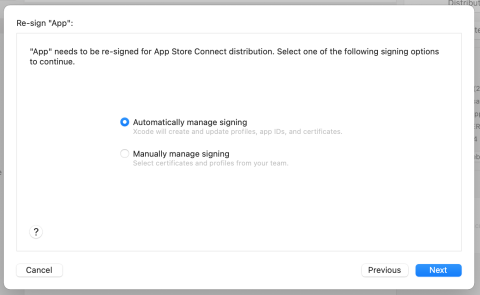
For Re-sign {your_app_name}, select Automatically manage signing and click Next
For Review {your_app_name}.ipa content, review and ensure something doesn’t stand out as odd or look wrong. Using the defaults, everything here should be fine. If looking ok click Upload.
Several messages will be displayed and this process will run for several seconds. All going well and you'll see the following screen
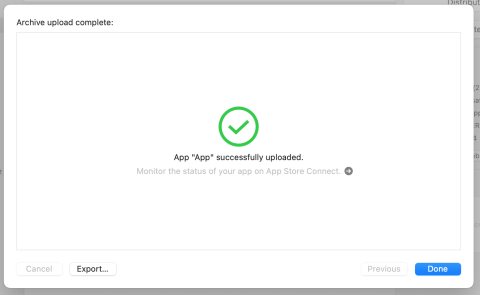
Click Done to close this window.
5. App Store Connect, Users
While App Store Connect is processing your upload, you will need to setup your testing team. Perform the following steps:
- Open your browser and go to https://appstoreconnect.apple.com/login
- Login with the account you created earlier
- Click Users and Access
- Click the blue + (plus) button at the top of the list
- Enter your tester’s First Name, Last Name and Email
- Check Developer to give them enough access to download and test your app
- Under Apps, either select the specific app you want this user to test or select All Apps so they can test any apps you upload.
- For the Additional Resources section, I usually leave those blank.
- Click Invite
An email invitation will be sent and they’ll need to respond to before you can assign them in TestFlight.
6. TestFlight Test Team
If you’re still on the Users and Access screen, click App Store Connect in the top left, then click My Apps.
Your new app should be listed on the next screen with the weird, wireframe logo, we’ll fix that too.
Click on your app and then click TestFlight tab
If your build is not displayed, it is processing in the background and may take some time to show up. You will receive an email once your build is processed and at that point your build should appear.
In the meantime, let’s setup your test team. Perform the following steps:
- Still in the TestFlight tab, click the blue + (plus) next to Internal Testing
- In the Create New Internal Group window, give your test team a name. I recommend leaving Enable automatic distribution checked, that way your test team will be automatically emailed as soon as you release a new build for testing.
- You’ll now have a section of the page titled Testers (0).
- Click the blue + (plus) next to that title and select from your list of testers.
- Click Add and you’ll be returned to the TestFlight screen with your selected testers displayed.
NOTE: Testers must accept the initial invite before they can be added here. Once you add them here, they’ll receive another email inviting them to test the app. Testers must then install the TestFlight app on the device that is assigned to the email they gave you for their testing account.
7. TestFlight, finally!
Log into the App Store Connect, click on your app and then click on TestFlight.
Your processed build will appear under the Version you set before creating the archive. In the status column, it should say ⚠️ Missing Compliance Manage.
Click Manage
This next section you’ll have to answer for yourself, because it’s dependent on how you coded your app. My app doesn’t use any encryption or make calls to an https domain, so I’m selecting No.
If you select No here, the button Start Internal Testing will turn blue. Click that button and voilà, you’ve made it! The testers you setup previously should now be receiving emails, inviting them to accept and start testing your app.
If you selected Yes above, you’ll have a few more screens to review. Read through them carefully, they’re mostly self-explanatory. Apple provides some good guidance here for export compliance. Also, if you’re based in the US, you can review the US Department of Commerce information here, concerning software exports outside of the US. Once you get to the last screen, you’ll have the blue Start Internal Testing button. Click that and your testers will be notified!
8. Testing the app
For a tester to get access to the app:
- Install TestFlight from the App Store
- Open their email on the device and look for the app invite email
- Tap on the highlighted TestFlight word in their email and TestFlight should open, giving the tester the option to install your app.
Possible errors
Bundle identifier issue
Failed to register bundle identifier
The app identifier "{bundle identifier}" cannot be registered to your development team because it is not available. Change your bundle identifier to a unique string to try again.
In Xcode, check the bundle identifier is correct. You can cross-check by following these steps:
- Login to the App Store Connect
- Left side General sub header, click App Information;
- Check the information under Bundle ID and confirm it's the same as the app
Photo library usage description - NSPhotoLibraryUsageDescription
We identified one or more issues with a recent delivery for your app, "{app_name}" 1.0.5 (2). Please correct the following issues, then upload again.
ITMS-90683: Missing Purpose String in Info.plist - Your app‘s code references one or more APIs that access sensitive user data. The app‘s Info.plist file should contain a NSPhotoLibraryUsageDescription key with a user-facing purpose string explaining clearly and completely why your app needs the data. If you're using external libraries or SDKs, they may reference APIs that require a purpose string. While your app might not use these APIs, a purpose string is still required. For detailsEssentially, NSPhotoLibraryUsageDescription is missing info.plist key.
How to resolve? As the comment refers, an adjustment is required in the apps info.plist file.
You can edit the Info.plist file directly:
Path: ios > App > App > Info.plist
	<key>NSPhotoLibraryAddUsageDescription</key>
	<string>This app requires access to the photo library.</string>
	<key>NSPhotoLibraryUsageDescription</key>
	<string>Store fish photos for the app from the server to reduce mobile data requirement</string>
Through Xcode, by opening the file Info and clicking the + icon. Scroll down and select
| Key | Value |
|---|---|
| Privacy - Photo Library Additions Usage Description | Add text that is relevant to what you are doing. For me I added: This app requires access to the photo library. |
| Privacy - Photo Library Usage Description | Store fish photos for the app from the server to reduce mobile data requirement |