Localization is the process of showing other languages in your app and is surprisingly painless in iOS. For most of us the base version of the app will be written in English. Then you will localize the app to other languages. The process of localization in this article is based on the latest Xcode which is 12.1. One of the most challenging aspects to localization is ensuring that the app's text is translated by respective languages native speakers.
Remember that you might need to localize more than just text strings. As icons, images, dates and numbers (including money) need to appear differently.
Getting started
Xcode uses base internationalization for the default state of your app. Begin by applying localization to your app, have the "Use Base Internationalization" checkmark selected. Go to your project setting (selecting your project in the project navigator pane), selecting it in the projects and targets list. You will see two tabs: Info and Build Settings. Info is the one that we will use.
Project > Info > Localizations
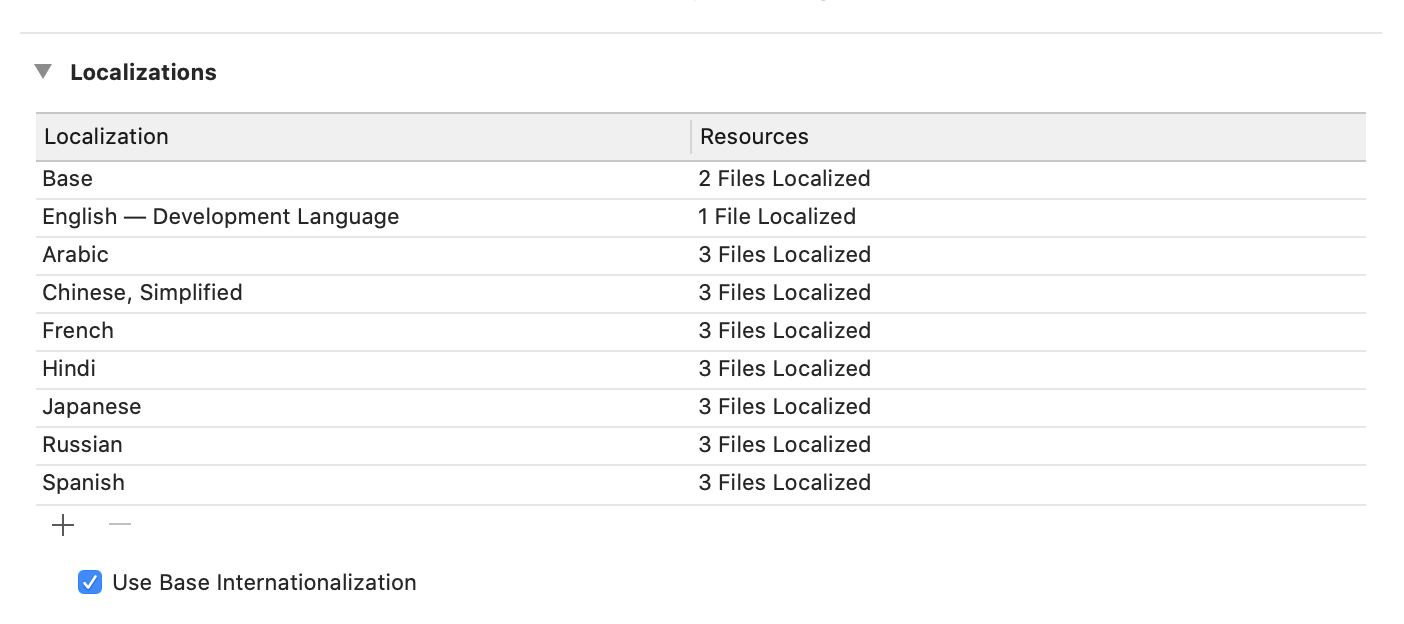
The base language is usually English, but this can be changed. In the image above, you will notice that along side English is the phrase Development Language. This is the base language. Similarly, you might have also noticed a “Base.lproj” directory inside your project. That is the localized form of your project assets that will be used for your base language. As other languages are added to your app, more of these directories will be created. As seen in the image above, other localization directories will include:
- ar.lproj – (Arabic)
- es.lproj – (Spanish)
- fr.lproj – (French)
- hi.lproj – (Hindi)
To list a few. The Info tab is where we configured the languages we want for our app, and you should already see “English - Development Language” in the list of localizations. Below this list are add [+] and remove [-] buttons. Click on the add button. A pop-up menu will appear asking you what language you’d like to target. The resource files in my list included:
- LaunchScreen.storyboard
- Localizable.string
- Main.storyboard
Select all of them and then Click the Finish button. This action will generate string files under the new language project folder named [new language].lproj. If you selected Russian, then the new directory will be ru.lproj and will contain two files:
- LaunchScreen.strings
- Main.strings
Localizing text you create in code
Great you have completed the initial step in adding a language to your app. Go to the File menu and choose
New > Group
Name the new group Localizable
Go back to the file menu (or right click the Localizable directory) and choose
New > File

select Strings File from the list of file types

Click Next
Title the name of this file Localizable.strings, click Create to open it for editing. Localizable.strings file is where you add translation data as key-value pairs.
By default this new file won’t be enabled for l10n, but if you activate the file inspector (Alt+Cmd+1) you should be able to find and click the Localize button. This will ask you what language this file should be moved to, but it’s empty so it doesn’t matter what you select. When you dismiss the dialog you’ll see the Localize button has been replaced with checkboxes for your available languages – please check them both.
Multiple Localizable.strings files now exist. One under the Base.lproj folder and under their respective language folders (such as ar.lproj, fr.lproj, etc...).
Adding words and phrases
Adding text to the Localizable.strings file of Base. The strings file stores value in a key = text pairing. On the left is the name of the string you want to localize. This is what you’ll use to reference each string in your code, so it needs to be unique. On the right is the English text you want to associate with this string name. This is what you’ll get back when you load the string key. A simple illustration of text in this file is
"Settings" = "Settings";
Okay, in this instance there is nothing to see. However, the structure is in place. In this instance we are showing a word only. However, keeping it as a word, in the French Localizable strings (French) strings file
"Settings" = "réglages";
Or Russian
"Settings" = "hастройки";
Or Hindi
"Settings" = "समायोजन";
Whereas a phrase will appear in the base of English
"SettingsDemoText" = "Change the language of the app now you have the app language changing at the flick of a switch";
In French
"SettingsDemoText" = "Changez la langue de l'application maintenant que la langue de l'application change en un clic";
Spanish
"SettingsDemoText" = "Cambie el idioma de la aplicación ahora que el idioma de la aplicación cambia con solo presionar un interruptor";
How to apply the localized text
To add the localized text, it isn't added directly. Instead, by adding the following code to one of your view controllers:
let labelDemo = NSLocalizedString("SettingsDemoText", comment: "Show the result of changing languages")NSLocalizedString is a central function in localization, and causes Xcode to look up the meaning of “SettingsDemoText” in the current localization. If "SettingsDemoText" hasn't been added to the respective lproj directory, not an issue - in this instance the defined a comment: "Show the result of changing languages" will be displayed.
How to apply the localized string to a storyboard UILabel? Having pulled across the UILabel to a view controller the variable demoLbl will appear as:
@IBOutlet weak var demoLbl: UILabel!
Apply the labelDemo to the demoLbl:
demoLbl.text = labelDemo